
How to Edit Ecommerce Product Photos
To edit ecommerce product photos, preserve the original and define the destination requirements, then use a repeatable sequence: crop and align, clean the background and edges, retouch temporary artefacts, correct exposure and colour against a reliable reference, sharpen for the final output size, verify accuracy, and export from the approved master. The governing rule is to improve presentation without changing the product’s real shape, material, texture, colour, or condition; batch only adjustments that remain valid across comparable images.
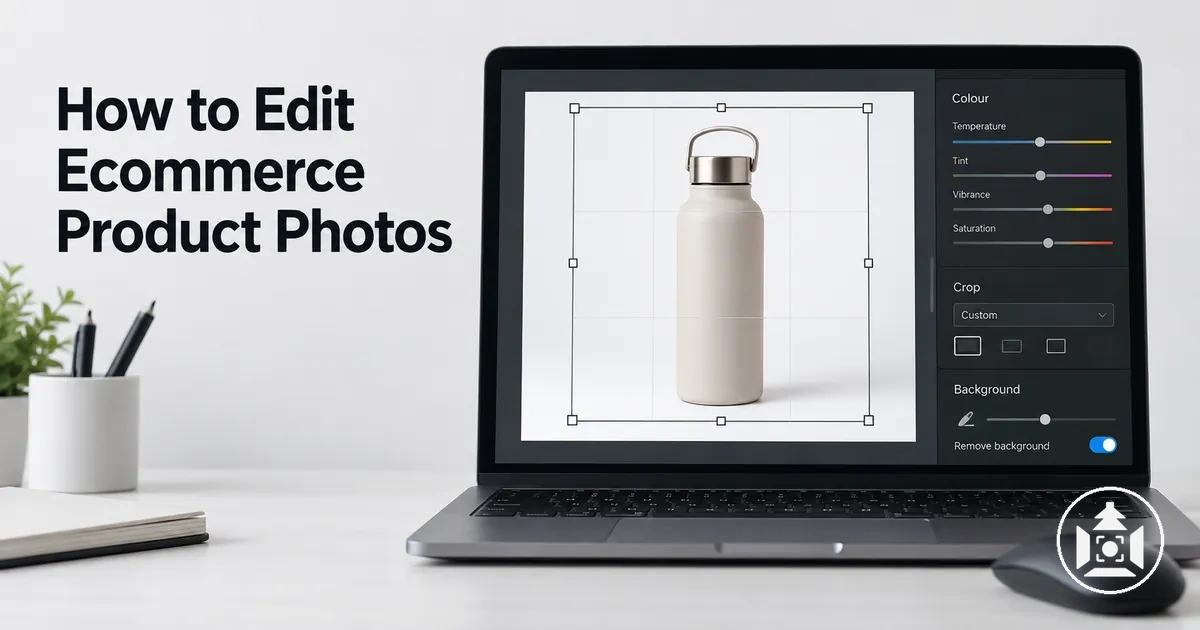
Ecommerce product photo editing workflow at a glance
Use this sequence to move from a captured source image to a verified delivery file while keeping product fidelity as the editing boundary.
- PrepareKeep the original untouched, identify a trustworthy product reference, and define the destination requirements.
- Set the geometryCrop and align to the required aspect ratio or canvas while preserving true product proportions and intentional margins.
- Clean and refineCorrect background contamination and edge problems, then remove only temporary capture artefacts rather than genuine product detail.
- Correct appearanceAdjust exposure, white balance, contrast, saturation, and reference matching as needed; sharpen only existing detail for the intended output size.
- Scale repeatable edits carefullyBatch only approved adjustments that behave consistently across comparable images, with exceptions handled individually.
- Verify and exportCheck accuracy and consistency at 100% zoom and at the intended display size, then export a test derivative from the approved master before producing the full set.
- Fidelity boundary
- Editing should not invent missing detail or alter the item’s real shape, material, texture, colour, or condition.
- Destination rule
- Framing, format, dimensions, compression, and colour handling should follow the intended ecommerce use rather than a universal preset.
The condition of the source image limits what corrective editing can achieve: colour, framing, background, and visible distractions can be refined, but the editing process should not misrepresent the product’s shape, material, texture, colour, or condition.
Consistency comes from applying the same editing logic and verification criteria across related ecommerce product photos rather than forcing identical adjustment settings onto every image.
Destination requirements also constrain edited product images because framing, appearance, and final output need to match the intended ecommerce use.
Before corrective adjustments begin, the source files, reference characteristics, and intended output should be prepared clearly enough for later edits to remain controlled and repeatable.
Table of Contents
Prepare Product Images Before Editing
Preparing product images before editing means preserving the untouched source image and original file, checking whether the source is sufficiently editable for the intended result, defining the output requirements, and establishing a reliable reference image or product sample before adjustments begin.
These prerequisites reduce avoidable rework because later decisions can be evaluated against known source conditions and output constraints.
If a dependable colour reference is unavailable or important product detail is absent from the source, editing cannot reliably reconstruct information that was never captured; use a better source or reference when accurate recovery matters.
Source readiness and output constraints determine what later edits can reasonably do.
Capture-stage quality belongs to ecommerce product photography; editing-stage preparation evaluates the resulting source file and identifies limitations that must be preserved or accounted for rather than assuming they can be corrected.
A reliable colour reference or product sample supports colour decisions, while uncertain reference information limits how confidently colour can be corrected.
Target framing, background treatment, aspect ratio, dimensions, and other destination needs should be defined as output requirements before editing because they constrain later crop, cleanup, and export choices.
A prepared input set makes these readiness conditions visible before adjustments begin: the untouched source remains available, the reference is identifiable, the target frame is defined, and a working copy can be edited without replacing the original file.
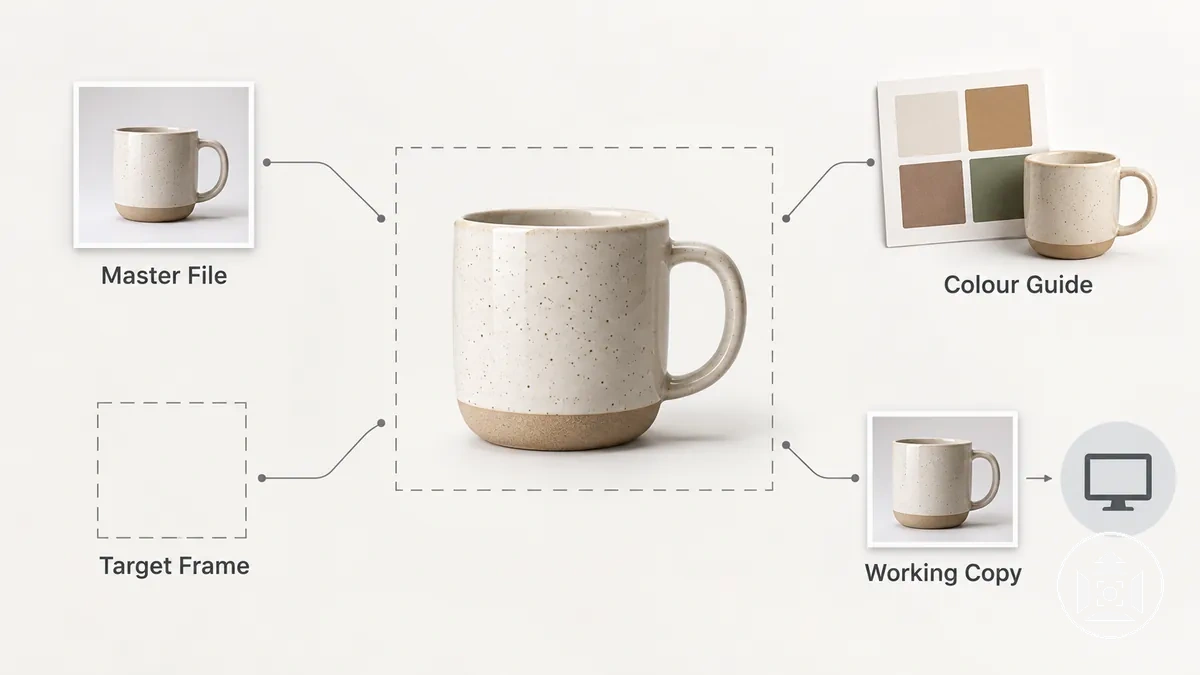
Before editing, verify each prerequisite and its consequence for the working process:
- Preserve the source: keep the original file untouched and perform non-destructive editing on a separate working version so the source remains available for comparison or a fresh edit.
- Check editability: confirm that the source image contains the product detail and visual information needed for the intended output; information that was not captured cannot be treated as reliably recoverable through editing.
- Establish a reference: identify a trustworthy reference image, product sample, or other colour reference when appearance accuracy depends on comparison; without one, colour correction is limited to what can be inferred from the source.
- Define target framing: establish the intended aspect ratio, orientation, product scale, and framing boundaries before cropping so later composition decisions work toward a known frame.
- Define background treatment: decide whether the existing background is retained, cleaned, replaced, or removed according to the intended output, rather than changing it without a defined purpose.
- Confirm output constraints: record the required dimensions, aspect ratio, file-purpose constraints, and destination needs that affect how the edited image must be prepared.
- Use a non-destructive workflow: retain the master source and make reversible adjustments where the working method permits, allowing later changes without repeatedly altering the only original.
For example, a source set with preserved originals, the same reliable product reference, and defined output requirements is ready for consistent later batch decisions.
A mixed set with uncertain references, different framing intentions, or missing source detail needs those readiness problems separated first; capture-stage deficiencies or deeper image faults belong outside editing preparation when they cannot be resolved by planning alone.
Edit Product Photos in a Consistent Workflow
A consistent product photo editing workflow orders broad, dependency-setting edits before local refinement and final verification.
The editing sequence should establish image boundaries and broad appearance first because later adjustments are made within those decisions.
This edit order reduces avoidable rework and supports repeatability without requiring identical adjustments for every product image.
Crop and alignment establish the working geometry, while background cleanup resolves broad edge and surrounding-area decisions that can affect later refinement.
Retouching and colour correction can then address local distractions and appearance within that established context, with sharpening applied after the relevant geometry and appearance changes so final detail treatment reflects the intended output.
The workflow can therefore be read as: boundary-setting edits → appearance correction → local refinement → verification.
This sequence is easier to understand visually when one product image progresses from framing and cleanup through retouching or colour refinement, final detail treatment, and verification.
Each stage establishes context for the next rather than acting as an isolated correction.
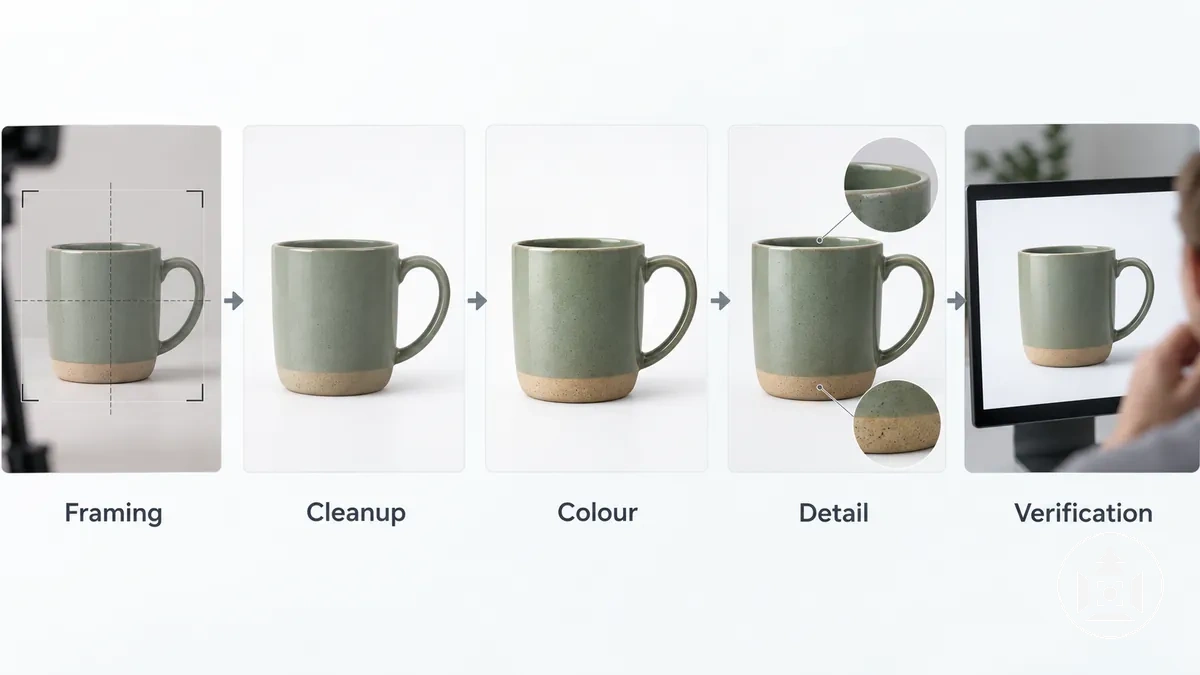
Repeatability means applying consistent decision logic to comparable inputs, not forcing identical pixel changes onto every image.
Image-specific source conditions can require different adjustment strengths, while verification provides the final control point for checking whether the result follows the intended workflow and output requirements.
Crop and Align the Product Within the Frame
Set the target frame before making the crop, then adjust product scale, alignment, margins, and orientation so the product fits the intended aspect ratio or canvas without distortion or unintended clipping.
Crop decisions establish the image geometry, so acceptable framing preserves the full product, its true proportions, an appropriate scale, and consistency with the intended display context.
Scale, margins, and alignment should be judged together because changing one alters the product's visual position within the frame.
The framing geometry should make the intended image bounds and product placement clear before the crop is finalised.
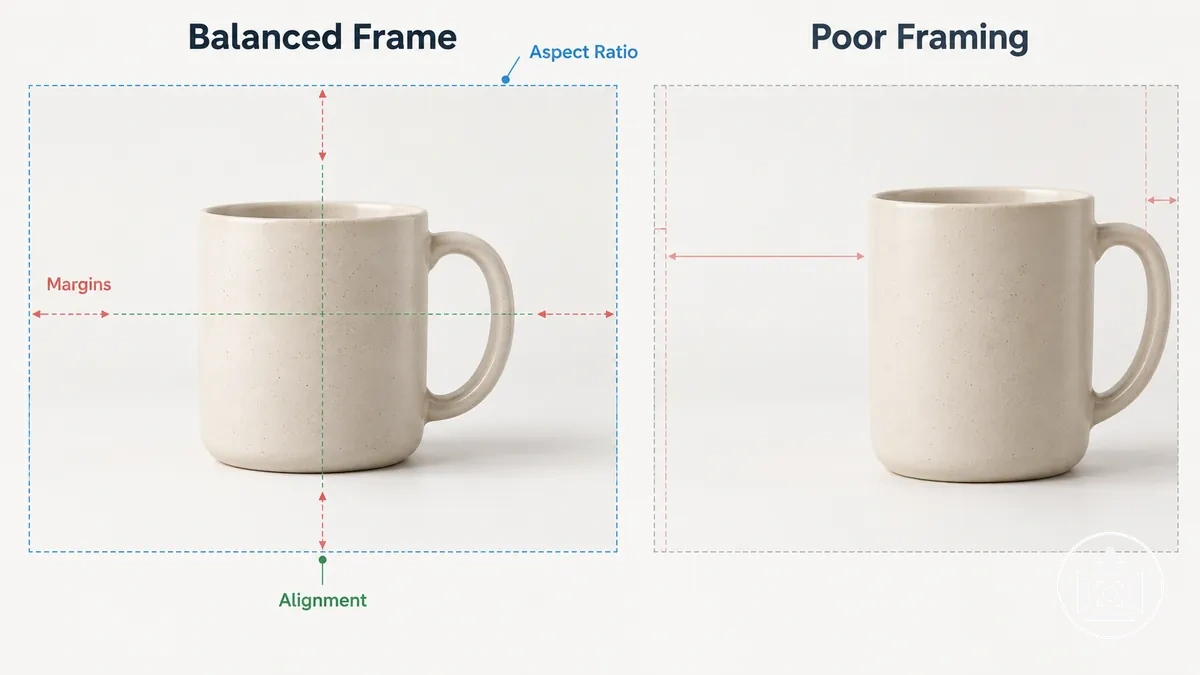
The target aspect ratio and output dimensions should follow the relevant ecommerce image requirements rather than a universal pixel size or an assumption that every product needs a square crop.
A technically valid crop can still make a catalogue set look misaligned if the product appears noticeably larger, smaller, higher, or lower than comparable images intended for the same display context.
The crop should therefore maintain true proportions while using product scale, margins, orientation, and alignment appropriate to its destination.
Use the frame as the reference for these four crop and alignment decisions:
- Set the ratio or canvas: establish the intended aspect ratio or canvas before changing the image bounds.
- Position and orient the product: adjust alignment and orientation within the frame while keeping the product's true proportions.
- Check scale and margins: confirm that product scale and surrounding margins suit the intended display context without distortion or clipping important product features.
- Preview and adjust: view the crop at the intended display shape, correct the framing where necessary, and verify true proportions before continuing.
Clean the Background and Refine Product Edges
Background cleanup removes unwanted background contamination and marks, while edge refinement keeps product edges and masking natural enough to maintain the product silhouette and intentional contact detail.
A clean result should retain genuine edge texture and a contact shadow when that shadow is intentional to the presentation, rather than treating those details as background contamination.
Background consistency and edge quality are related but independently inspectable: a uniform background can still surround rough masking or colour fringing, while a precise cutout edge can sit against an inconsistent background.
The intended treatment determines whether the background is white, transparent, or retained; background cleanup corrects unwanted contamination within that treatment, whereas background replacement changes the background itself, and product retouching addresses distractions on the product rather than the surrounding area.
The annotated example identifies the silhouette boundary, subtle fringe or rough edge, cleaned background, and intentional contact shadow so these conditions can be inspected separately.
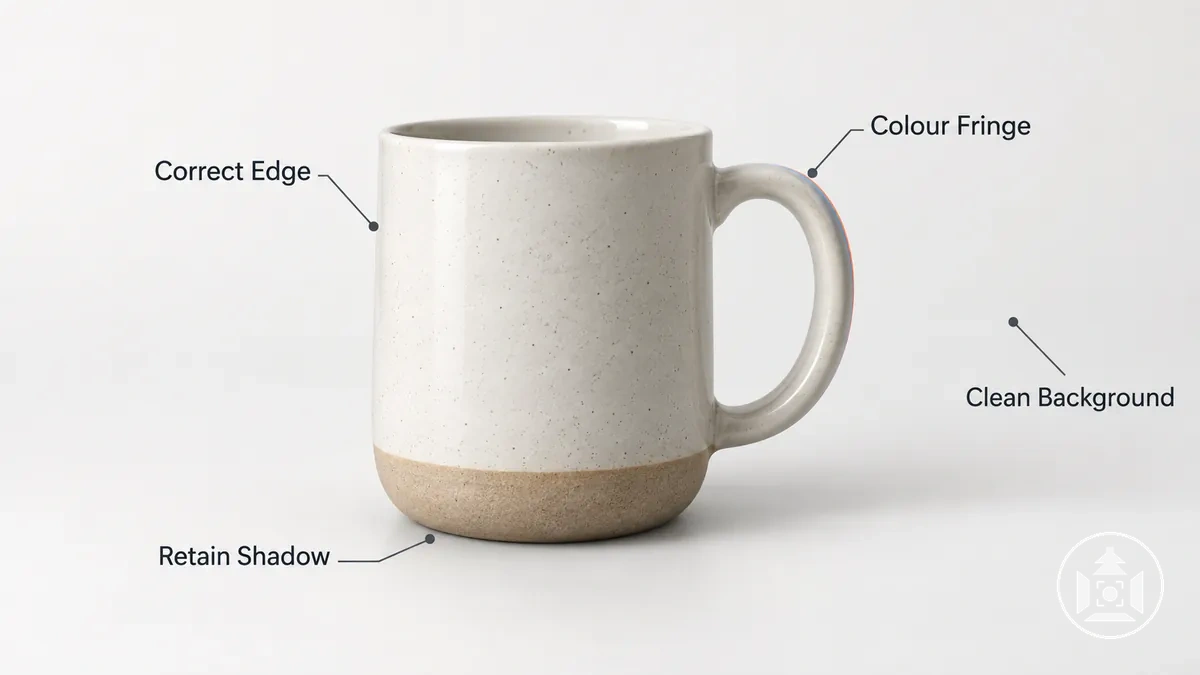
Inspect background and edge quality using these criteria:
- Edge smoothness: product edges should follow the natural product silhouette without obvious jagged masking, artificial rounding, or loss of genuine edge detail.
- Colour fringing: inspect the cutout edge for residual colour contamination that does not belong to the product and correct it without changing the underlying silhouette.
- Unwanted marks: background contamination or other distractions in the surrounding area should not remain when they are unrelated to the intended background treatment.
- Background consistency: the visible background should remain coherent with the intended white, transparent, or retained treatment rather than showing unintended patches or inconsistent cleanup.
- Contact-shadow preservation: retain an intentional contact shadow when it supports the intended presentation and natural depth instead of treating every shadow as unwanted background contamination.
Retouch Dust, Blemishes and Minor Distractions
Product photo retouching should remove or reduce temporary capture artefacts and minor distractions while preserving genuine product features, texture, material, finish, and condition.
Dust, a sensor spot, fingerprint, lint, or another temporary blemish can be corrected when it is identified as a capture artefact rather than part of the product itself.
For each observed mark, first classify it as a likely capture artefact or a genuine product feature, then make the correction or preservation decision.
Temporary dust, lint, fingerprints, sensor spots, and setup artefacts can be cleaned up when they do not represent the item, while product texture, seams, grain, genuine wear, and manufacturing detail should remain when they are real characteristics of the product.
If the status of a mark is uncertain, use a reliable product reference before changing it rather than assuming it is a blemish.
For example, removing a temporary speck sitting over a fabric surface is appropriate, but removing a real seam or woven grain would misrepresent the item.
The annotated example distinguishes removable artefacts from authentic product detail so the retouching decision remains visually clear.
Local correction should maintain the product's real shape and surface characteristics rather than introducing invented detail or changing its apparent condition.
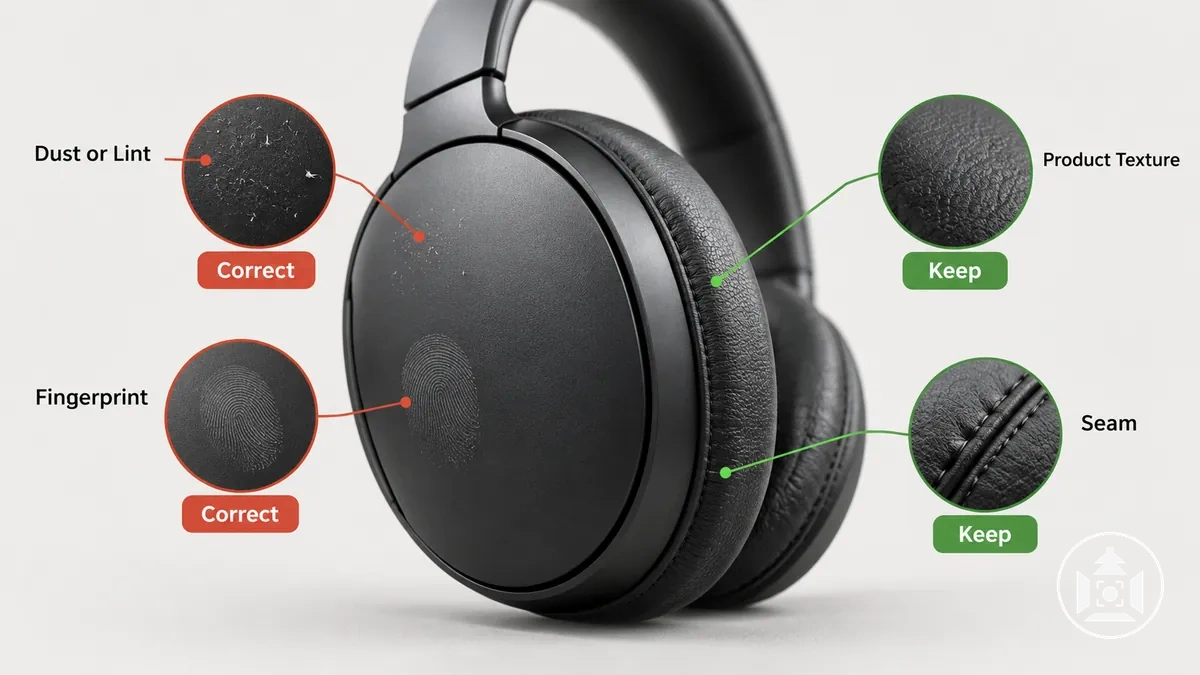
Truthful representation is the final criterion: correct temporary capture artefacts, but preserve genuine product features when changing them would misrepresent the product.
Correct Exposure and Product Colour
Exposure and colour correction should improve product visibility while matching the most trustworthy available product reference as closely as the source and viewing conditions allow.
Exposure and tonal balance control how light and dark the image appears, while white balance and colour correction address colour cast and product hue; these controls are related, but they are not interchangeable.
Evaluate tonal controls and colour controls separately before deciding what needs adjustment.
Exposure sets overall brightness, and contrast changes the separation between lighter and darker tones; neither should be used as a substitute for correcting a colour cast.
White balance addresses a global temperature or tint bias, while saturation changes colour intensity and can reduce product fidelity when pushed beyond the product reference.
A global cast affecting the whole image therefore calls for a different correction from a product-specific colour mismatch that remains after the broader colour state looks neutral.
Use these criteria to compare each tonal or colour attribute with the best available product reference and determine the appropriate correction:
- Exposure: adjust overall brightness when the product appears materially lighter or darker than the intended presentation, while retaining visible product detail.
- White balance: correct a global colour cast when neutral or known reference areas indicate an overall temperature or tint bias.
- Contrast: adjust tonal separation when highlights, midtones, and shadows do not represent the product clearly, without using contrast to compensate for an unrelated colour mismatch.
- Saturation: adjust colour intensity when it differs from the trustworthy product reference, avoiding extra saturation solely for visual impact.
- Reference matching: compare product hue and overall appearance with a trustworthy physical sample or approved reference image; confidence in colour accuracy is lower when no reliable reference is available.
Routine correction can address observable exposure, tonal, white-balance, saturation, and reference-matching differences, but a persistent or unexplained mismatch may require correcting product photo colour shifts through separate diagnosis rather than stronger routine adjustments.
Colour accuracy cannot be guaranteed by editing alone because source capture, output colour handling, reference quality, and display conditions can all affect the final appearance.
Without a trustworthy product reference, colour correction can improve an evident global cast, but confidence that the resulting product colour matches the physical item remains limited.
Apply Final Sharpening Without Overprocessing
Final sharpening should enhance existing edge detail after the main edits are complete, but it cannot reliably recreate detail lost to missed focus or severe source blur.
The appropriate sharpening level therefore depends on the visible detail already present and how the image appears at the intended output size.
Sharpening strength and radius, or their software-neutral equivalents, control how strongly local edges are emphasized.
Too little sharpening can leave edges soft at the final viewing scale, while too much can create halos, amplify noise, and make fine texture look brittle or artificial.
Judge the result at the intended output size because suitability depends on viewing scale, source quality, noise, and texture.
Use these three visible states to recognize whether the final sharpening level is appropriate:
- Under-sharpened: important edges remain visibly soft at the intended output size; increase sharpening cautiously while checking whether existing edge detail becomes clearer without new artefacts.
- Appropriately sharpened: edges show natural crispness, fine texture remains believable, and no obvious halos or amplified noise appear at the intended viewing scale; keep the adjustment at this level.
- Over-sharpened: bright or dark halos appear around edges, noise becomes more prominent, or texture looks brittle and exaggerated; reduce the sharpening strength or radius-equivalent control until those artefacts subside.
If visible blur comes from missed focus or a severely soft source, stronger sharpening is no longer the right response and fixing blurry ecommerce images requires separate diagnosis.
Routine output sharpening can refine existing detail, but it should not be treated as a substitute for source focus or as a universal fix for blur.
Batch-Edit Repeatable Adjustments Across Product Images
A batch edit should begin only after a representative image has been approved and only for adjustments that are genuinely repeatable across the selected group.
The representative image acts as the validated baseline for crop rules, resize settings, broad tonal adjustment, or standardised background treatment.
A preset can support repeatable adjustments, but it should not be assumed to suit every source image without review.
Batch-safe changes are those that respond consistently to comparable inputs, such as repeated crop logic, resizing, broad tonal adjustments, or standardised background treatment.
Image-specific retouching, local defects, unusual reflections, lighting differences, or material-dependent corrections should remain exceptions rather than being forced through the same preset.
The batch therefore applies shared decision logic while preserving a route for individual correction when source conditions differ.
Use this controlled sequence to apply repeatable adjustments without propagating an unsuitable baseline:
- Choose a representative sample: select an image that reflects the typical lighting, framing, background, and product characteristics of the batch, then approve its baseline treatment before scaling.
- Save repeatable adjustments: retain only the crop, resize, tonal adjustment, background treatment, or other settings that are genuinely reusable across comparable images.
- Apply a controlled batch: apply the repeatable adjustments to the selected group rather than combining materially different source conditions in the same batch.
- Spot-check outputs: inspect representative results for framing, tone, background treatment, and other repeated attributes instead of assuming uniform success.
- Isolate exceptions: separate outliers for individual correction when lighting, product material, local defects, or other source differences make the shared settings unsuitable.
For example, a group containing matte products under even lighting and glossy products with stronger reflections can share crop, resize, and some workflow rules while still requiring different tonal or local corrections.
This controlled use of shared rules supports maintaining consistent product images without forcing identical pixel-level changes across heterogeneous inputs.
A final spot-check identifies where the batch remains suitable and where exceptions need separate treatment.
Verify Product Accuracy and Editing Consistency Before Export
Final edit verification is a pass/fail quality gate: each product image should meet observable checks for product accuracy, cleanliness, detail, and editing consistency before export.
A check passes when the edited state matches the intended product presentation without visible artefacts or unexplained differences from comparable images in the set.
If a condition fails, return to the relevant edit, correct the issue, and verify it again rather than treating the export as final.
Inspect each image at 100% zoom for pixel-level artefacts and at the intended display size for presentation and cross-image consistency, because the two viewing scales reveal different problems.
Full-size inspection can expose residual marks, rough edges, noise, or sharpening artefacts, while display-size inspection shows whether framing, detail, colour, and cross-image consistency remain suitable in the final viewing context.
Use the checklist as a verification control rather than a subjective test of attractiveness, and re-check any failed condition after correction.
- Framing: pass when product scale, alignment, orientation, and margins remain intentional and consistent with comparable images; if the product appears clipped, displaced, or inconsistently scaled, return to the framing edit.
- Edge cleanup: pass when product edges follow the natural silhouette without obvious rough masking, fringing, or lost edge detail; visible edge artefacts require further cleanup.
- Residual marks: pass when temporary dust, lint, fingerprints, sensor spots, or setup artefacts no longer distract from the product; remaining capture artefacts should be corrected without altering genuine product features.
- Exposure: pass when the product remains clearly visible with usable highlight, midtone, and shadow detail; unexplained brightness differences should return to tonal correction.
- Colour: pass when the product colour and white balance remain consistent with the most trustworthy available reference; a visible colour cast or unexplained mismatch requires another colour check.
- Detail: pass when genuine product texture, seams, grain, finish, and other real features remain visible and truthful; missing or artificially altered detail requires review of the relevant local correction.
- Sharpening artefacts: pass when edges show natural crispness without obvious halos, amplified noise, or brittle texture at the intended viewing scale; visible artefacts require reduced or revised sharpening.
- Cross-image consistency: pass when comparable images use coherent framing, tonal treatment, background treatment, product scale, and colour handling without forcing identical pixel-level adjustments; unexplained outliers should be corrected individually.
- Viewing scale: pass only after the image has been inspected at both full size and intended display size and no scale-specific artefact remains; otherwise correct the failed condition and re-check before export.
Export Edited Product Photos for Ecommerce Use
Export creates a destination-specific delivery file from the verified master, so the export settings should match the intended ecommerce destination and image purpose rather than a universal preset.
Preserve the verified master as the approved source and create derivative files from it instead of overwriting it.
The delivery file should carry forward the approved edit while adapting output characteristics such as dimensions, image format, compression, and colour handling for its destination.
Dimensions should match the required output size for the intended use. For photographic product images without transparency, JPEG or WebP are common delivery choices; PNG is useful when lossless raster output or alpha transparency is required, subject to the destination’s supported formats and file-size limits. Choosing ecommerce image formats is one output decision alongside compression, colour handling, compatibility, and file size.
Compression should balance file weight against visible image quality rather than follow one fixed percentage, because suitable settings depend on the image content, selected format, and destination.
Excessive compression can introduce visible blocking, ringing, or loss of fine detail even when the underlying edit is correct.
Colour handling should remain compatible with the intended output workflow. sRGB is the conventional colour space for general web delivery unless the destination specifies a different colour workflow; keep the verified master separate from delivery derivatives.
- Choose the required characteristics: set the destination-appropriate dimensions, image format, compression, colour handling, and other required output properties while keeping the verified master unchanged.
- Export one test: create a single delivery file using the selected export settings before processing the remaining images.
- Inspect quality and behaviour: check the test export for visible compression artefacts, unexpected colour changes, lost detail, compatibility issues, or file-size consequences that make the selected settings unsuitable.
- Produce the remaining derivatives: apply the validated export settings to the rest of the approved images only after the test file passes inspection.
Use the test export to confirm that the selected settings produce the expected visual result and file behaviour before creating the full set.
Inspect it at the intended display size and, where useful, at full size for output-specific problems that were not visible in the verified master.
Produce the remaining delivery files only after that test passes.
Use Repeatable Export Presets and File Naming
Saved export presets reduce repeated setup, while a stable file naming convention improves traceability across product-image outputs, provided both remain simple enough to use consistently.
An export preset should standardize repeatable output settings, while each filename should contain only the identifiers needed to distinguish and reproduce the relevant product image.
Keep preset-controlled settings separate from filename fields, using only operational attributes that improve repeatability and identification:
- Export preset: save repeatable output settings such as dimensions, compression, and colour handling so the same approved delivery pattern can be reproduced consistently.
- Product identifier or SKU: include the stable product identifier needed to connect the filename to the correct item and support traceability.
- View or angle: add a concise view or angle field when multiple photographs of the same product would otherwise be ambiguous.
- Variant: include a colour, size, or other operational variant only when separate variants need to be distinguished in the output set.
- Version: add a version field when multiple approved or revised outputs of the same product image must remain distinguishable.
A concise generic filename might be SKU123-front-blue-v2.webp, where the SKU identifies the product, “front” identifies the view, “blue” distinguishes the variant, and “v2” identifies the version.
If a product has only one view and no meaningful variant or revision, those optional fields can be omitted rather than added unnecessarily.
The filename pattern should remain as short as possible while preserving clear identification, traceability, and reproducibility.